Configure Neovim - Adding A Fuzzy Finder
Published on Oct 15, 2025
Now that we have a nice looking UI with Lualine and Noice, it’s time to add one of the most essential plugins for Neovim - a fuzzy finder. Telescope.nvim is a highly extendable fuzzy finder that allows you to search files, grep through your project, browse Git commits, and much more, all from within Neovim.
What is Telescope.nvim?
Telescope.nvim is a fuzzy finder over lists built on top of the latest Neovim features. It provides an interactive interface for searching and filtering through various sources like files, buffers, help tags, Git branches, and more. Think of it as your command center for navigating your project efficiently.
Prerequisites
Before installing Telescope, make sure you have:
- Neovim 0.9.0 or later
- ripgrep (for live grep functionality)
- fd (optional, for faster file finding)
- fzf (optional but recommended, for fuzzy finding)
To install ripgrep on Windows using Winget:
winget install BurntSushi.ripgrep.MSVC
# installing fzf in windows
winget install junegunn.fzf
Installing Telescope.nvim
1. Create the Plugin File
Following our established file structure, create a new file called telescope.lua in your plugins folder:
lua/
    config/
    plugins/
        colorscheme.lua
        noice.lua
        lualine.lua
        telescope.lua
2. Add the Plugin Configuration
Open the telescope.lua file and add the following code:
return {
  'nvim-telescope/telescope.nvim',
  tag = '0.1.8',
  dependencies = {
    'nvim-lua/plenary.nvim',
    'nvim-tree/nvim-web-devicons'
  },
  config = function()
    local telescope = require('telescope')
    local actions = require('telescope.actions')

    telescope.setup({
      defaults = {
        prompt_prefix = "🔍 ",
        selection_caret = "➜ ",
        path_display = { "truncate" },

        mappings = {
          i = {
            ["<C-k>"] = actions.move_selection_previous,
            ["<C-j>"] = actions.move_selection_next,
            ["<C-q>"] = actions.send_selected_to_qflist + actions.open_qflist,
          },
        },
      },

      pickers = {
        find_files = {
          theme = "dropdown",
          previewer = false,
        },
      },
    })
  end
}
Let me explain what’s happening in this configuration:
Dependencies:
plenary.nvim- A Lua utility library required by Telescopenvim-tree/nvim-web-devicons- Provides file icons in the results
Configuration Options:
prompt_prefix- The icon shown in the search promptselection_caret- The indicator for the currently selected itempath_display- How file paths are displayed (truncated to fit)mappings- Custom keybindings within Telescope<C-k>and<C-j>- Move up and down in results<C-q>- Send selected items to quickfix list
3. Setting Up Keymaps
To make Telescope easily accessible, we need to set up keymaps. Create or update your config/keymaps.lua file like so:
lua/
    config/
        options.lua
        keymaps.lua
    plugins/
Add the following keymaps to your keymaps.lua file:
-- Telescope keymaps
local builtin = require('telescope.builtin')

-- Find files in current directory
vim.keymap.set('n', '<leader>ff', builtin.find_files, { desc = 'Find Files' })

-- Live grep search in project
vim.keymap.set('n', '<leader>fg', builtin.live_grep, { desc = 'Live Grep' })

-- Search through open buffers
vim.keymap.set('n', '<leader>fb', builtin.buffers, { desc = 'Find Buffers' })

-- Search help tags
vim.keymap.set('n', '<leader>fh', builtin.help_tags, { desc = 'Find Help' })

-- Search recent files
vim.keymap.set('n', '<leader>fr', builtin.oldfiles, { desc = 'Recent Files' })

-- Search current buffer
vim.keymap.set('n', '<leader>/', builtin.current_buffer_fuzzy_find, { desc = 'Search Current Buffer' })
Don’t forget to load this file in your init.lua:
require("config.keymaps")
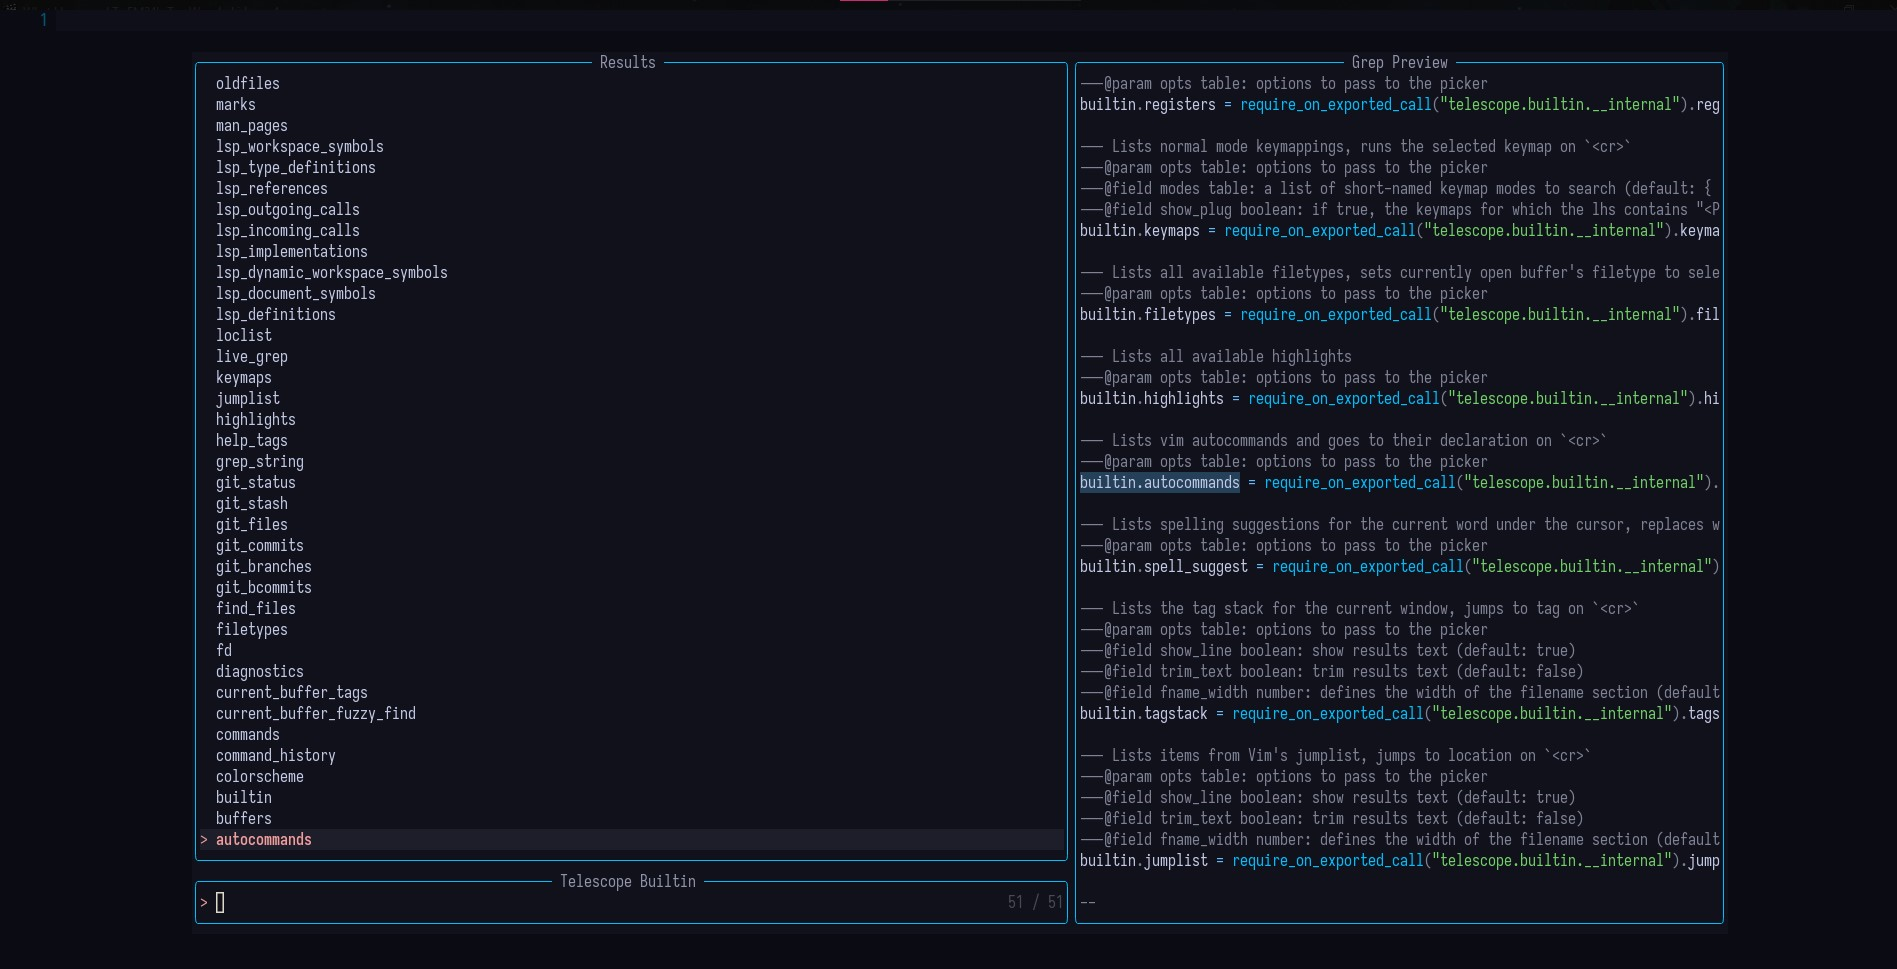
4. Using Telescope
After saving your files and restarting Neovim, Lazy.nvim will automatically install Telescope and its dependencies. Here’s how to use it:
Find Files: Press <Space>ff to search for files in your current directory
- Type to filter results
- Use arrow keys or
Ctrl+j/kto navigate - Press
Enterto open the selected file
Live Grep: Press <Space>fg to search text across your entire project
- Type your search query
- Results update in real-time
- See file previews on the right
Find Buffers: Press <Space>fb to switch between open buffers quickly
Help Tags: Press <Space>fh to search through Neovim’s help documentation
Advanced Configuration (Optional)
If you want to enhance Telescope further, you can add extensions. Here’s an example with the popular fzf-native extension for better sorting:
return {
  'nvim-telescope/telescope.nvim',
  tag = '0.1.8',
  dependencies = {
    'nvim-lua/plenary.nvim',
    'nvim-tree/nvim-web-devicons',
    {
      'nvim-telescope/telescope-fzf-native.nvim',
      build = 'make'
    },
  },
  config = function()
    local telescope = require('telescope')

    telescope.setup({
      -- previous configuration here
    })

    -- Load the fzf extension
    telescope.load_extension('fzf')
  end
}
Tips and Tricks
-
Ignore Files: Create a
.gitignorefile in your project root. Telescope respects it automatically. -
Search Hidden Files: Press
<C-h>while in Telescope’s find_files to toggle hidden file visibility.<C>is the control key on a keyboard. -
Multi-Select: Use
<Tab>to select multiple files, then<C-q>to send them to the quickfix list. -
Preview Toggle: Press
<M-p>to toggle the preview window on and off.
Conclusion
Telescope.nvim is an indispensable tool for navigating your projects efficiently. With its fuzzy finding capabilities and extensible architecture, it dramatically improves your workflow in Neovim. The keymaps we set up make it quick to access from anywhere in your editing session.
In the next post, we’ll explore adding a file explorer like nvim-tree or neo-tree to complement our fuzzy finding capabilities. You can find my previous Neovim configuration posts here.