Configure Neovim - Adding UI Plugins
Published on Feb 21, 2024
Add UI Plugins to Neovim Configuration
With the colorscheme added to our Neovim configuration, we can add UI plugins to make the default Neovim configuration better for us. So in this post we are going to add some more plugins to our config to make our use of Neovim enjoyable.
1. Noice Plugin
A highly experimental plugin that completely replaces the UI for messages, cmdline and the popupmenu. Another great plugin by the prolific folke,
this shows popup messages for notifications and gives a nice little view for entering commands and searches. This creates a great visual look.
To add this plugin to the Neovim config by creating a new file called noice.lua in the plugins folder.
lua/
    /config
    /plugins
        colorscheme.lua
        noice.lua
So opening this file we can paste the following code from the Noice github link. Go through the Readme file in order to better understand and configure the plugin.
-- lazy.nvim
{
  "folke/noice.nvim",
  event = "VeryLazy",
  opts = {
    -- add any options here
  },
  dependencies = {
    -- if you lazy-load any plugin below, make sure to add proper `module="..."` entries
    "MunifTanjim/nui.nvim",
    -- OPTIONAL:
    --   `nvim-notify` is only needed, if you want to use the notification view.
    --   If not available, we use `mini` as the fallback
    "rcarriga/nvim-notify",
    }
}
config = function()
require("noice").setup({
  lsp = {
    -- override markdown rendering so that **cmp** and other plugins use **Treesitter**
    override = {
      ["vim.lsp.util.convert_input_to_markdown_lines"] = true,
      ["vim.lsp.util.stylize_markdown"] = true,
      ["cmp.entry.get_documentation"] = true, -- requires hrsh7th/nvim-cmp
    },
  },
 -- you can enable a preset for easier configuration
  presets = {
    bottom_search = true, -- use a classic bottom cmdline for search
    command_palette = true, -- position the cmdline and popupmenu together
    long_message_to_split = true, -- long messages will be sent to a split
    inc_rename = false, -- enables an input dialog for inc-rename.nvim
    lsp_doc_border = false, -- add a border to hover docs and signature help
  },
})
end
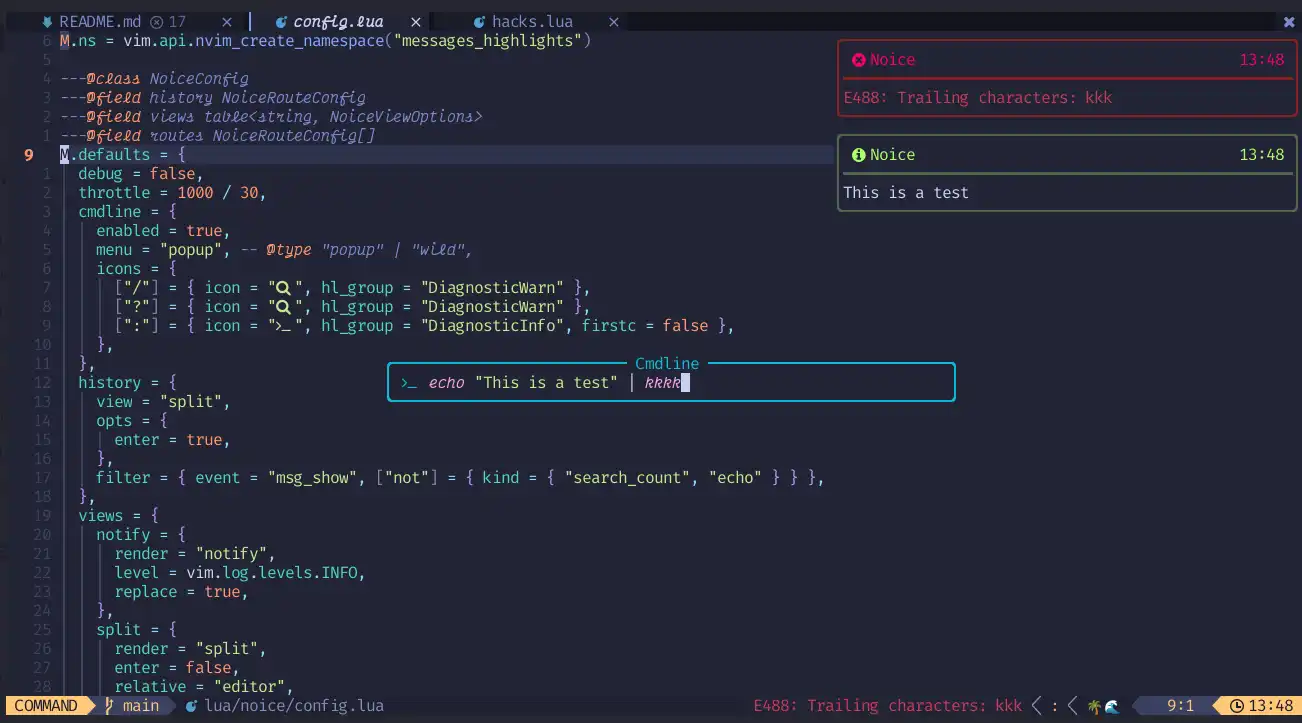
So we end up with a nice looking notification, command and search system like below:
These options can be changed, read the documentation from the github repository and tweak the options to suit your tastes.
You can see the command entry in the middle and the notifications at the top right corner of the window. Lazy.nvim will install the dependencies
automatically for you so no need creating a new file.
In the next post we will cover the status bar seen in the picture above, there are different plugins to do that and we will select one to use. If you will like to know how to start from scratch start here. You can also find my previous post here.
Thank you for reading.